Word can make a professional-looking newsletter using the Page Layout features and other tricks. Here’s an example so you can try the tools:
Initial setup
1. Open a new document.
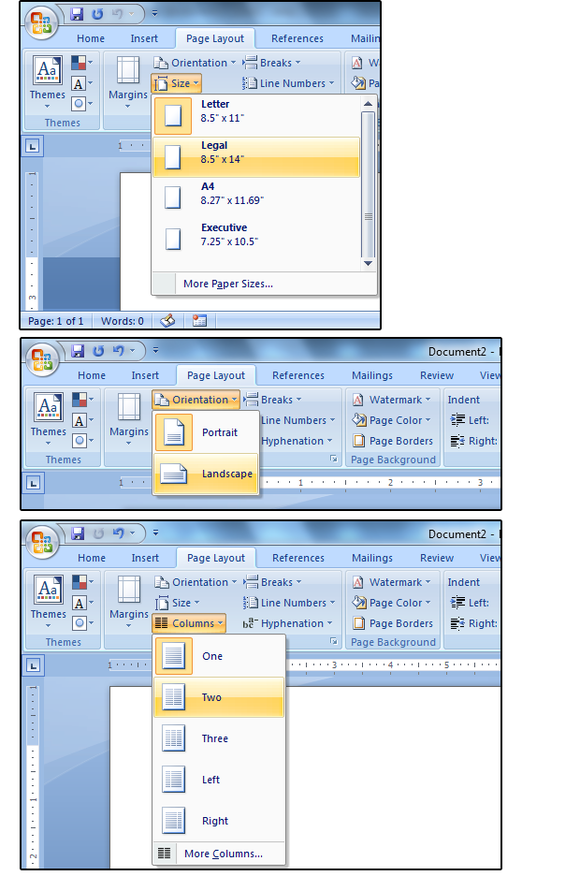
2. Go to Page Layout > Page Setup, click the Size button and choose Legal 8.5” x 14” from the drop-down list.
3. From the same location, click the Orientation button and select Landscape from the drop-down list.
4. Next, click the View tab and choose the One Page button so you can see the entire page.
5. From the same location, click the Columns button, and choose Two columns from the drop-down list. Since we’re planning to fold this page in half, this option actually gives us four pages.
 JD Sartain
Set the paper size, orientation, and columns
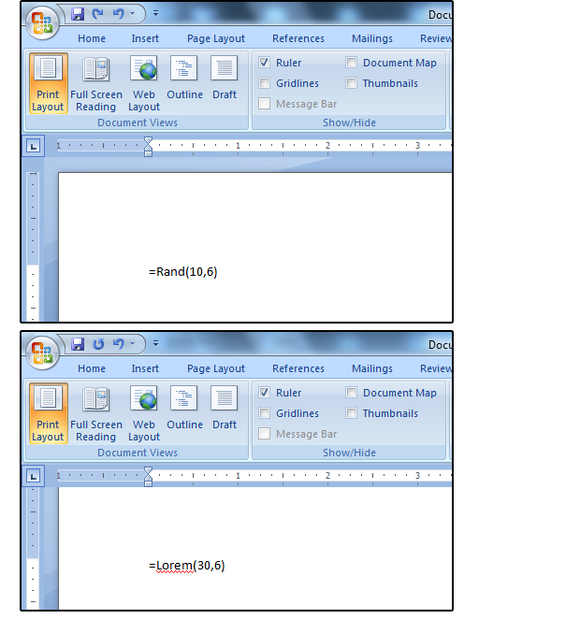
Return to Normal (100%) view. Then add some generic text to this newsletter.
6. Press Ctrl+Home to position your cursor at the beginning of the document.
7. Type =Rand(30,6) in the Home position, then press the Enter key. (Note: As soon as you press the Enter key, the text drops in). The first number equals the number of paragraphs (30), and the second number determines the number of sentences in each paragraph (6). This should be enough to create a sample newsletter. If not, you can always change it, or add more.
Note: If you prefer Latin, type =Lorem(30,6), then press the Enter key.
 JD Sartain
Use the Random Text command to enter some test data.
Help! =Rand() and =Lorem() aren’t working!
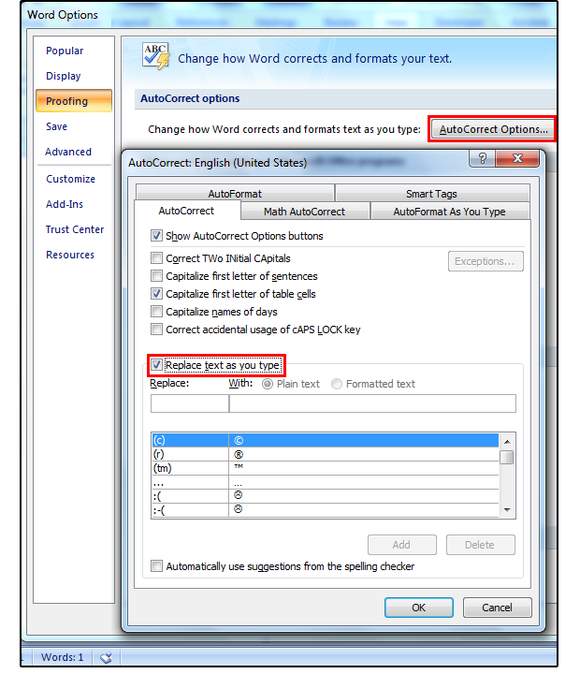
If you entered one of the random text commands followed by the Enter key and nothing happened, one of your AutoCorrect options needs a change.
1. Select File > Options > Proofing.
2. When the Format screen appears, click the AutoCorrect Options button.
3. Under the AutoCorrect tab, scroll down to the middle of the dialog screen, and click the checkbox beside the phrase Replace text as you type. Click OK, and the dialog screen closes. Click OK again, and the Options screen closes.
 JD Sartain
Change the AutoCorrect options.
4. Return to the random text command, click the End key to move to the end of the command, then press the Enter key, and the text fills in.
Page Setup
Notice that the margins are too large and the gutter (where the page folds in half) is too small. Here’s how to fix that.
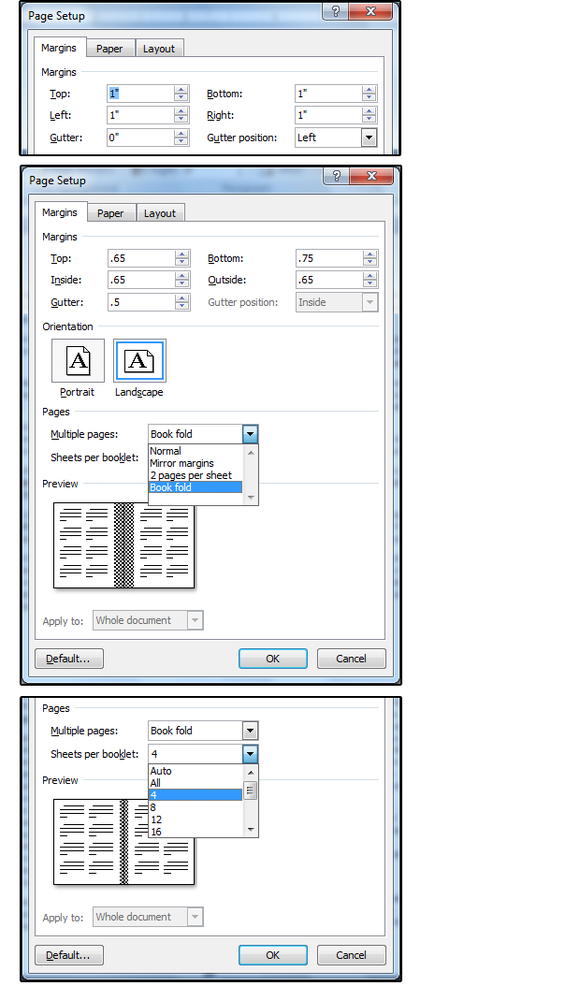
1. Go to Page Layout > Page Setup, click the Margins button, then scroll down to the bottom of the drop-down list and click Custom Margins.
2. Under the Margins tab, notice that the margins are set to Word’s default: Top, Bottom, Left, and Right set at one inch, gutter set at zero, and Gutter Position set to Left. Before you can modify these settings properly, you must first change the Multiple Pages setting (under Pages) to Book Fold. This changes the Margin options. Just click the arrow beside the Multiple Pages field box and select Book Fold from the list.
3. Move to the next field, Sheets per Booklet, and choose 4 (or as many pages as you need) from the drop-down list. You can also select All and let Microsoft make the final count for you.
4. Notice that Top, Bottom, Gutter, and Gutter Position are the same (although Gutter Position is grayed-out), but Left and Right have changed to Inside and Outside. Set the Top, Inside, and Outside to 0.65″; set the Bottom to 0.75″; and set the Gutter to 0.5″. Notice the Preview picture of your document at the bottom of the dialog window. As you modify the options, it reflects your changes. Click OK.
Note: The space margin between the pages is the Gutter size plus the Inside Margin (combined).
 JD Sartain
Set margins, multiple pages, and booklet sheet.
5. Now, back to the document and—oops, something’s wrong. It looks okay on the Preview, but the actual document is askew because the default is set to begin on an odd page. Click the Layout tab on the Page Setup screen and under Section > Section Start, choose Even Page from the dropdown list.
6. Next, choose Insert > Footer. Scroll down through the list and select a footer for both the left and right pages.
7. With the Footer guides still active/showing (in Design mode), position your cursor on the left (even) page. Select the Page Number button, and choose Bottom of Page from the drop-down list. Scroll through the list of Page Number designs and choose one that displays the page number on the outside of the left page. Do the same for the right-hand (odd) page.
8. Your document should now show pages 2 and 3 on the current screen, and pages 4 and 1 on the following screen (if not, you can make the adjustment when you print the newsletter).
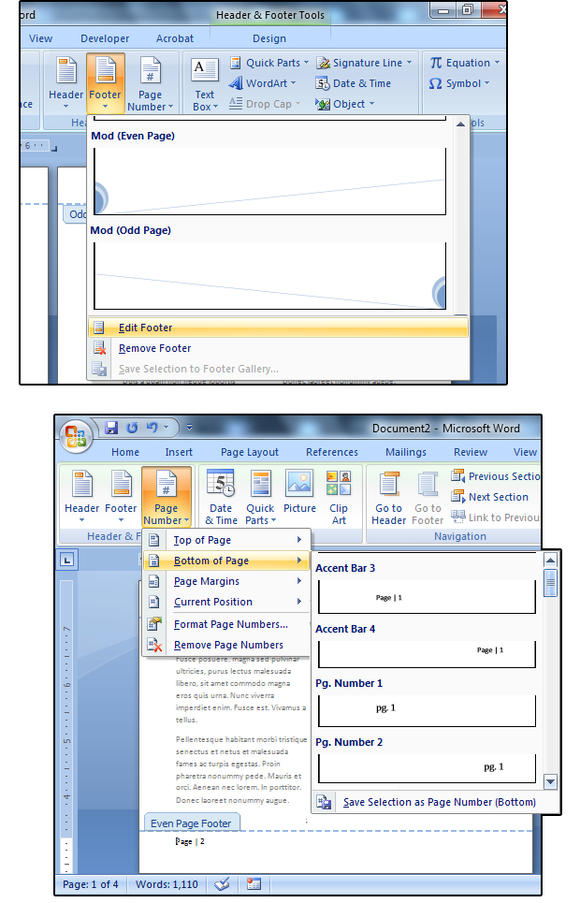 JD Sartain
Insert footers and page numbers.
Insert Captions & Format Graphics
After you’ve inserted all your stories/articles, it’s time to go back and place your graphics, charts, and photos. Standard practice is at least one photo per story, but that’s not set in stone. The idea is to break up the text with graphical elements and try to balance the text, images, and white space. Search online for “Newspaper Layouts” under “Images,” and you’ll discover hundreds of great ideas.
Design and layout are beyond the scope of this article; however, the instructions below explain how to insert and format graphical elements.
1. Position your cursor at the beginning of the second paragraph.
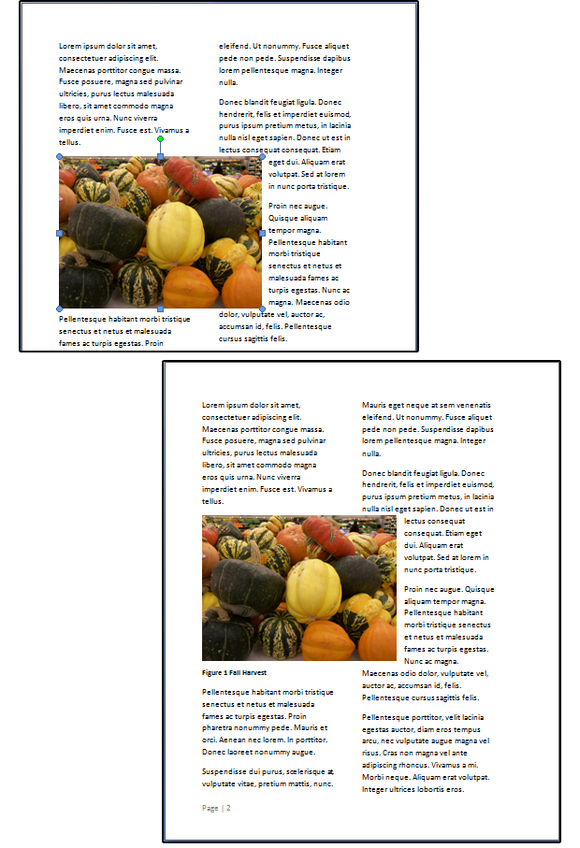
2. Select Insert > Picture. When the Insert Picture dialog window opens, navigate to the applicable image, select that image, then click the Insert button. Notice that Word sizes the image to fit inside the selected column.
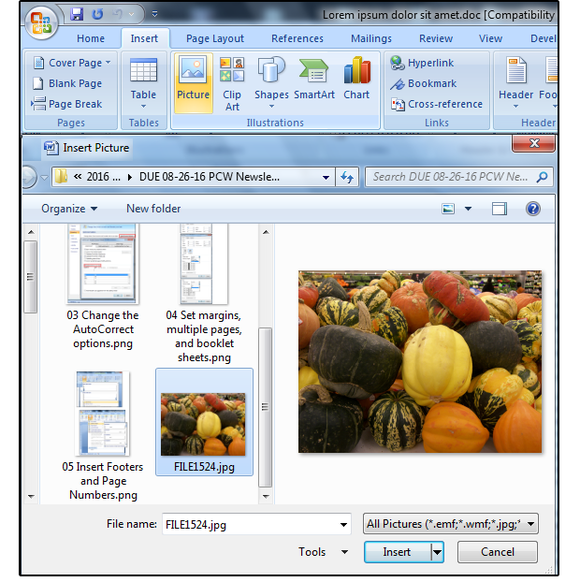 JD Sartain
Insert Picture from the Ribbon menu.
3. Place your cursor on the photo and right-click the mouse. Select Insert Caption from the context menu. It’s much easier if you enter the caption before you choose/define Borders and Shading or Format Picture.
4. Under Options, select Figure, Equation, or Table from the list menu.
5. Under Caption, enter a few words or a phrase that describes the image.
6. In the Position field, choose Above selected item or Below selected item.
7. Click the Numbering button if you want to change the format of the Figure, Table, or Equation numbers. For example, Figure IV (Roman numerals), Equation B (letters), Table A-7 (Alphanumeric), and so forth.
8. When finished, click OK.
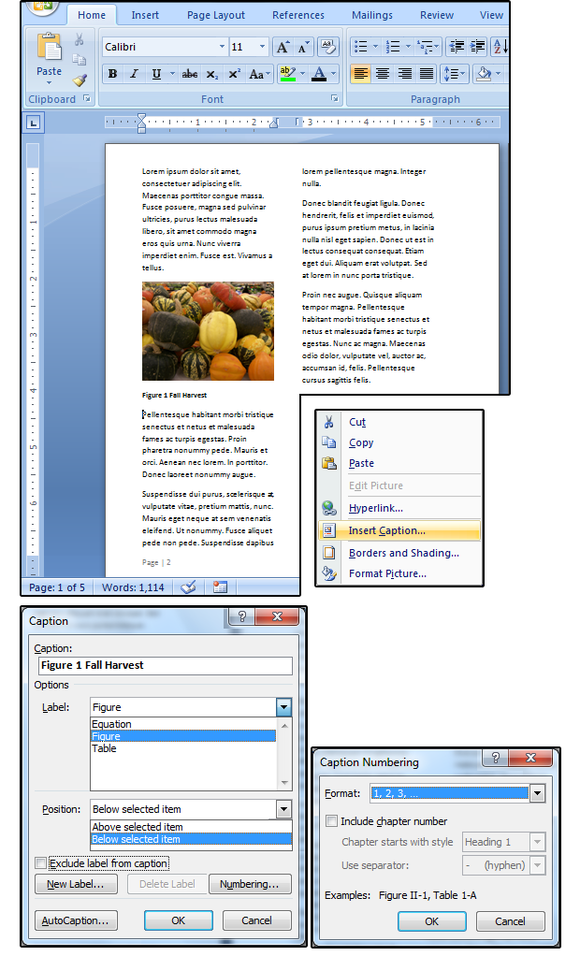 JD Sartain
Insert Caption
9. Place your cursor on the photo again, and right-click the mouse again. Select Format Picture from the context menu.
10. If you want to modify the picture properties, click the Format tab in the Format Picture dialog window.
11. For Wrapping Style, choose the Tight button. For Horizontal Alignment, choose the Left button.
 JD Sartain
Format Picture: Wrapping Style and Alignment
12. Click the Advanced button to view additional Layout options, such as Picture Positioning and Advanced Text Wrapping features.
13. Click the Picture tab if you want to crop the image or modify the Color, Brightness, or Contrast.
14. Click the Size tab if you want to alter the height, width, or rotation, or scale the image based on percentage ratios.
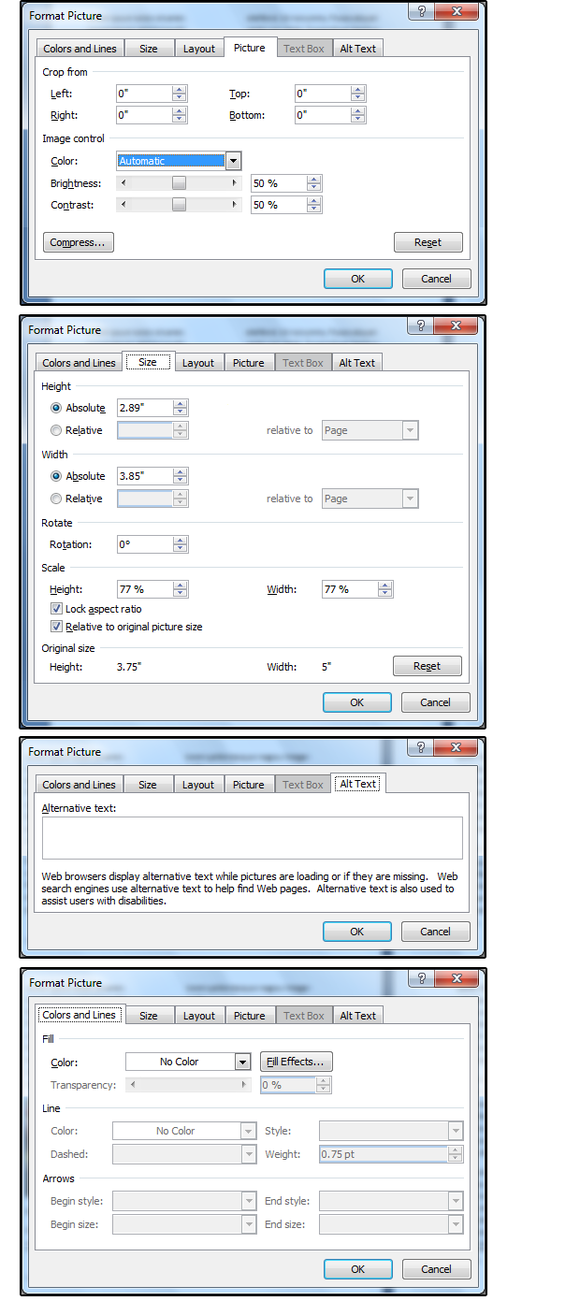 JD Sartain
Modify the Picture attributes, Size, Alt Text, and Colors.
15. The Alt Text tab is used for websites, to enter an alternative text description (in case the image doesn’t appear online).
16. The Colors tab is used to define Fill and Line colors (and/or arrows) for graphical elements such as illustrations, charts, graphs, etc.
17. Browse through each of these dialog windows and experiment with the various features. When finished, click OK.
18. Notice that the image has resizing handles. Grab the bottom-right handle and stretch the image down and to the right until it extends halfway through the second column. Notice how the text automatically wraps itself perfectly around the photo.
You’re almost done. Insert the rest of your graphical elements, add your titles, logo, and subheads, then print the newsletter, and pass it around.
 JD Sartain
Use the resizing handles to alter the image, then watch the text wrap around the photo.