 Image: Rob Schultz
Reinstalling Windows is an important strategy for any geek, and a useful skill for anybody who doesn’t want to pay one. By starting over with a clean copy of the operating system, you can remove bloatware, wipe out malware, and fix other system problems.
A full, clean reinstall is different from the Reset your PC option in Windows 10 and 8, or a manufacturer’s recovery partition or disk for Windows 7. Those built-in options will set your PC back to its factory-default state—which could include some vendor-installed junk you never wanted anyway. A clean install uses the generic Windows installation media that you can download from Microsoft, and it’ll have just the OS, no other frills.
You shouldn’t need to regularly reinstall Windows to keep it performing well. But, if a computer is bogged down by startup programs, context menu items, and years of junk, reinstalling Windows may be the quickest way to speed it up again.
Reinstalling Windows can also save a computer infected with malware or afflicted by blue-screens and other system problems caused by software issues.
Before we begin, back up all of your personal data. While you should back up your data regularly, it is especially important to do so before reinstalling an operating system.
Reset or Refresh Your PC (Windows 10 and 8)
Windows 8 added ”Refresh your PC” and “Reset your PC” features that attempt to make installing Windows easier. Both of these options actually perform a Windows reinstall in the background, quickly installing a fresh Windows system from the recovery files on your computer’s drive, a Windows installation disc or USB drive.
On Windows 10, this option is just named Reset this PC. You can reset your PC and keep all your personal files and Windows Store apps, or reset your PC and wipe everything from your disc. Either way, you’ll have to install all your desktop programs again, but that’s the point: You get a fresh Windows desktop system with all your system files in a known-good state.
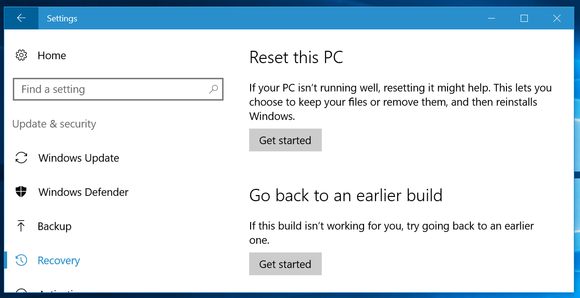
The “Reset this PC” option will reset Windows 10 to its factory default state.
If you choose to erase everything, Windows can even wipe your system drive so no one can recover your personal files later. This is the easiest way to remove your stuff from a PC before getting rid of it.
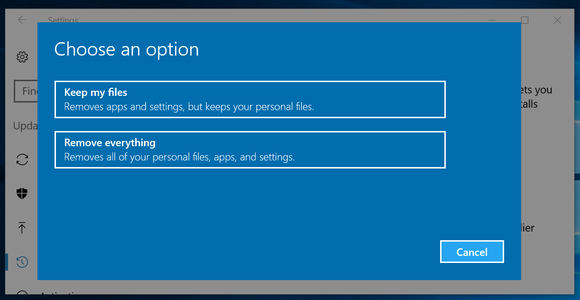
Resetting this PC will delete all your installed programs. You can choose whether you want to keep your personal files or not.
On Windows 10, this option is available in the Settings app under Update & security > Recovery. Click or tap Get Started under Reset this PC. You can then tell Windows to Keep my files or Remove everything.
If your computer isn’t booting properly, it will boot to the advanced startup options menu, where you can select Troubleshoot to reset your PC. You can also access these options by booting from a Windows recovery drive.
On Windows 8, both of these options are available in the modern PC settings app under Update and recovery > Recovery.
In Windows 10’s Anniversary Update, Microsoft is experimenting with a new “Give your PC a fresh start” tool that will allow you to reinstall Windows from here, erasing even all that manufacturer-provided junk. It should be just as good as installing Windows 10 from scratch. Look for a “Learn how to start fresh with a clean installation of Windows” option at the bottom of the Recovery pane after upgrading to the Anniversary Update.
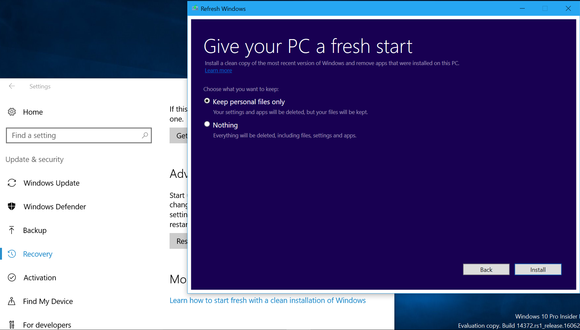
With the Anniversary Update, Microsoft may allow Windows 10 users to reinstall Windows 10 and remove the manufacturer-installed junk much more easily.
Use your manufacturer’s recovery partition or discs (Windows 7 or earlier)
In Windows 7 and previous versions of Windows, it’s up to the PC manufacturer to provide a recovery partition or recovery discs. Most manufacturers don’t include Windows installation discs with their computers.
If your computer has a recovery partition, run your manufacturer’s recovery tool to reinstall Windows. On many PCs, you’ll have to press a key during the boot process to access the recovery tool. This key may be displayed on your screen. It should also be printed in your computer’s manual.
If your computer comes with a recovery disc, you can also insert it in your computer’s optical drive and boot from it to begin reinstalling Windows. You’ll end up with the manufacturer’s like-new Windows system on your drive. All the original drivers will be installed, which is good, but all that nasty bloatware will also come back—that’s bad. You’ll have to remove unwanted junk software after you reinstall.
Download Windows Installation Media
The Reset feature and manufacturer-approved recovery tools may not help you get a clean, fresh Windows system. Reinstalling Windows from a Windows installation disc will.
If you’ve built your own PC and installed Windows on it, you should have a Windows disc lying around. If you don’t have a disc, you can download Windows 10 installation media from Microsoft or download a Windows 7 ISO file from Digital River. (UPDATE 2/25/15 Digital River no longer works; you can now download Windows 7 ISOs from Microsoft’s Software Recovery website.) You can still get Windows 8.1 installation media from Microsoft, too.
You can find the product key currently in-use on your Windows PC with a tool like NirSoft’s ProduKey. Write it down—you may need it later.
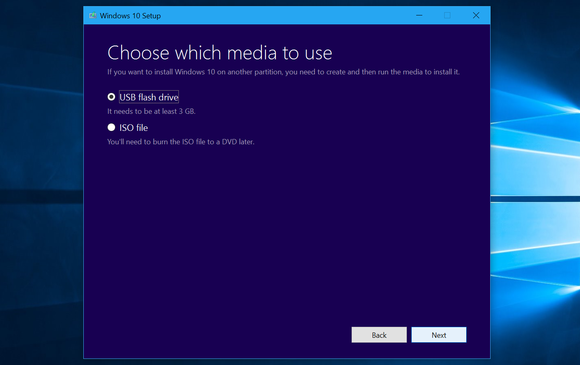
Use Microsoft’s Windows 10 download tool to put Windows 10’s installation files on a USB drive or download an ISO.
The Windows 10 and 8.1 download tools will guide you through creating USB installation media. If you’ve downloaded a Windows 7 ISO file and you’d rather not burn it to disc, you can use Microsoft’s Windows 7 USB/DVD download tool to put that Windows system on a USB drive and install it from USB.
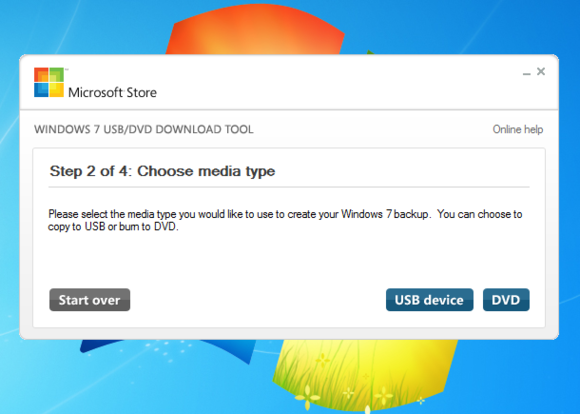
The Windows 7 USB/DVD download tool will ask what media you’re going to send your Windows image to.
Boot the Windows Installation Media
To perform a clean install of Windows, insert your installation media into your computer’s optical drive or USB port and reboot. Your computer should automatically boot from the removable media.
If it doesn’t, you may need to enter the computer’s BIOS and change its boot order or press a key during the boot process to access a boot menu and choose a boot device.
New Windows 10 and 8.1 PCs with UEFI firmware may allow you to choose a boot device in a different way. From within Windows, hold Shift and click the Restart option on the Settings charm panel or on the Start screen. You can also open the PC settings app, navigating to Update and recovery > Recovery and clicking Restart now under Advanced startup.
Your computer will reboot into the Advanced Startup Options menu. Select Use a device and choose the device you want to boot from. If your computer can’t boot Windows properly, don’t worry: It will boot directly to this menu so you can use these options to help fix things.
Reinstall Windows
Once the Windows installation media is booted, the Windows installer will take over and guide you through the process.
Pay particular attention to the disk partitioning options. You’ll want to replace your old Windows system without overwriting any other partitions or files you want to keep.
Download drivers for your PC
Modern versions of Windows have more built-in drivers than ever, so most of your PC’s hardware should work out of the box.
You can also grab the drivers and utilities you may need for your PC’s hardware from the manufacturer’s website.
Go to the manufacturer’s website and find the downloads page associated with your specific PC model. You can choose which files to download and install. During installation, be sure to un-check any boxes that will install any bloatware.
If you built your own PC, you’ll find these drivers and tools on the individual pages for each hardware component.
Create a custom refresh image (Windows 8 only)
Microsoft includes command-line tool with Windows 8 called recimg to create custom recovery images. This tool was removed from Windows 10, so it’s only helpful if you’re still using Windows 8 or 8.1.
This will save a lot of time and effort during any future refreshes.
First, make sure to uninstall bloatware and perform your favorite tweaks right after you get a new PC or reinstall Windows. Next, install your favorite software. Changes will be saved in the recovery image, so you don’t have to make them every time you refresh your PC.
Be sure to have a clean system before running recimg. Your custom recovery image won’t be squeaky clean if you’ve been using your Windows installation for a while, collecting temporary files and other garbage.
Microsoft tried to eliminate the need for all this fiddling with the new Refresh your PC feature, but the feature doesn’t go all the way. Sometimes, the best solution is to wipe everything and start with a clean slate.
Editor’s note: This article originally published June 27, 2014, and was updated June 26, 2016.