An Excel macro is an abbreviation for macroinstruction—a sequence of commands (or directives) that tell a computer program or a programming language (such as Visual Basic, C, Assembler, PHP, etc.) to perform a series of tasks; generally repetitive tasks, which are prone to errors if repeatedly keyed by hand. Application macros are often created using a macro recorder, which records the user’s keystrokes while performing the repetitive task, then replays those keystrokes every time the macro name or shortcut key is executed.
 JD Sartain / PC World
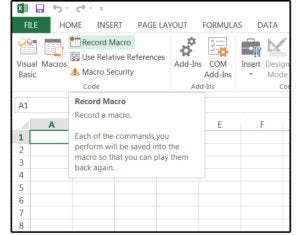
Application macros created using a macro recorder
What macros do
Programmers and end-users create and use macros for similar reasons: to simplify a complex procedure, to reduce a sequence of instructions down to a single program statement, or to automate repetitive tasks. For example, instead of manually separating city, state, and ZIP code from one column into three, create a macro; and instead of retyping the same header data on every spreadsheet you create, use a macro.
Macro tips, tricks, and essentials
The three most important macro fundamentals are:
Office Home and Business 2016
Always begin at the Home position; that is, Ctrl+ Home.Always use the directional keys to navigate: Up, Down, End, Right, Left.Always use relative cell addresses, which means the macro’s recorded keystrokes are relative to the starting cell’s location—A1, the Home position.
Based on these fundamentals, here are three further tips:
Using Absolute cell addresses means the exact cell locations are recorded into the macro. This limits the macro’s ability to function if anything changes, new data is added or removed, or the list gets longer.Keep your macros small and specific. For example, create one macro to sort the data, another macro to extract specific information, and a third macro to print the extracted information. If you combine all these tasks into one long macro, it runs slower (especially if it’s required to perform many functions or calculate a lot of formulas on a large spreadsheet). And if it fails, it takes forever to locate the point of failure—you have to step through the entire macro one keystroke at a time to find the errors. If you create small macros and run them separately, you can quickly review the results and verify the accuracy.Enter fixed values and fixed data in advance. This means any column that has fixed information that rarely or never changes, like product ID numbers, product prices, and/or product descriptions. Macros are for performing repetitive tasks such as entering formulas, sorting, formatting; or the complex tasks such as using a Pivot table’s filters to extract specific data, creating detailed Charts, or building complicated Tables.
Macro keyboard essentials
Take advantage of your keyboard to help you make precise macros. The End key (in conjunction with the arrow keys) are the most important keys—they’re the only way to navigate through a spreadsheet without hard-coding the cells. For example, to highlight column A, (from the Home position), you press the End key, then Shift+ Down arrow (simultaneously), and the column is highlighted. You can’t code or mouse to highlight A1 through A12 (hardcoded cell addresses) in a macro unless you know for certain the selection will never change.
When your cursor is positioned anywhere within your data table, press Ctrl+ A to highlight the “used” portion of your spreadsheet; that is, all the cells that contain data. Press Ctrl+ A twice to highlight the entire spreadsheet.
The macro WILL FAIL if you do not enter the keystrokes EXACTLY as Excel designed them to be used. For example, Ctrl+ A is a combination, simultaneous keystroke, which means you press and hold the Ctrl key, then press the letter A, then release both keys simultaneously (always signified by the plus + sign). End-Down is a combination, consecutive keystroke, which means you press the End key, release; then press the Down-arrow key and release—sequentially, not simultaneously (always signified by the hyphen/dash – symbol).
Before Microsoft cursed us with the Ribbon menu, the shortcut keys were displayed on the dropdown menus beside the commands they represented. The new Ribbon shortcut keys are displayed on the Ribbon Menu as white letters inside black boxes and are accessed through the Alt key. Press the Alt key once to activate Excel’s new shortcut keys; then again to turn them off.
 JD Sartain / PC World
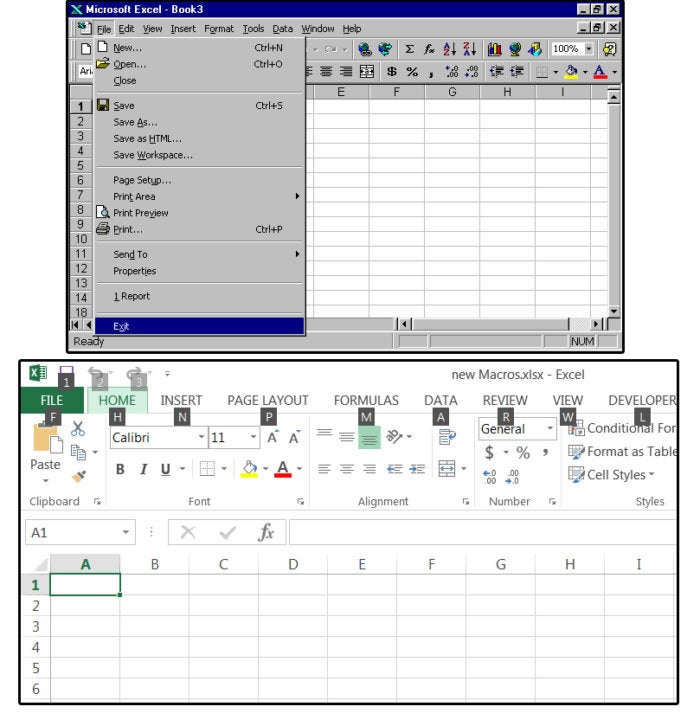
Shortcut keys on the dropdown and Ribbon menus
How to create, name, and use macros
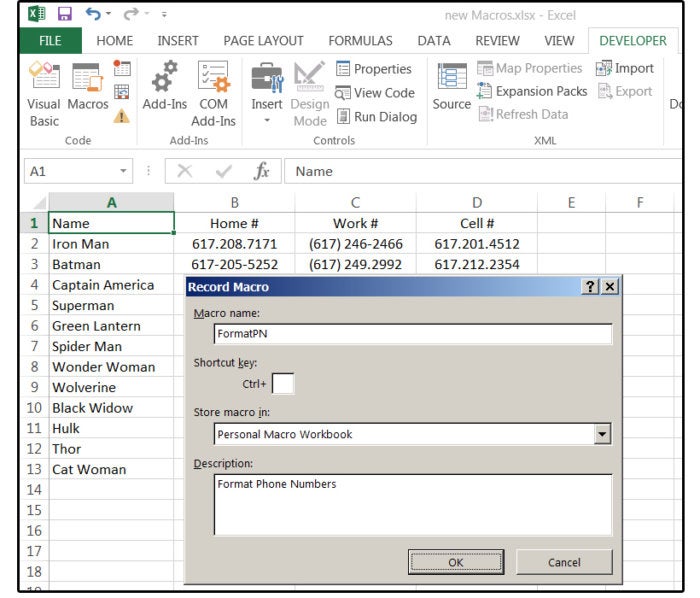
To record a macro, click Record Macro under the Developer tab. In the Record Macro dialog box, enter the following information and click OK when finished.
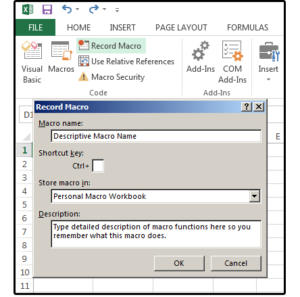
Macro Name: the first character must be a letter, followed by your choice of letters, numbers, or an underscore. No other characters are accepted.
Shortcut Key: CTRL+ J and CTRL+ M are available. If you choose any other character, your macro will overwrite that key’s original function; such as Ctrl+C for Copy and Ctrl+P for print. If you choose to use an already dedicated key, be sure to choose one that you seldom use, like Shift+F2 (add or edit a cell comment).
Save location: Macros saved in “This Workbook” or “New Workbook” function only in those workbooks. To use in all spreadsheets, save macros to the Personal Macro Workbook (PMW).
Description: Describe what the macro does.
 JD Sartain / PC World
Use the Record Macro dialog to name, describe, and save your macros
If you use a specific macro a lot, consider adding a macro button to the Quick Access Toolbar or to your own personal, customized group.
1. For the Quick Access Toolbar:
a. Select File > Options > Quick Access Toolbar.
b. When the Customize Quick Access Toolbar screen appears, select Macros from the Choose Commands From field box.
c. Select the macro (from the list) that you want displayed on the Quick Access Toolbar.
d. Click the Add button to move the selected macro to the other (right) panel.
e. Click the Modify button at the bottom of the right panel, then choose a symbol from the Modify Button dialog menu, and click OK.
f. Notice the new macro button on your Quick Access Toolbar.
2. How to add a macro button to your personal, customized group on the Ribbon menu:
a. Select File > Options > Customize Ribbon.
b. When the Customize Ribbon screen appears, check the “Developer” box inside the right panel, then click the plus + sign to open and close the groups under that tab.
c. Click the New Group button (bottom center of right panel), and Excel adds New Group (custom) at the bottom of the list.
d. Click the Rename button. When the Rename window appears, enter a name for your new group, then select a symbol from the icons library, and click OK.
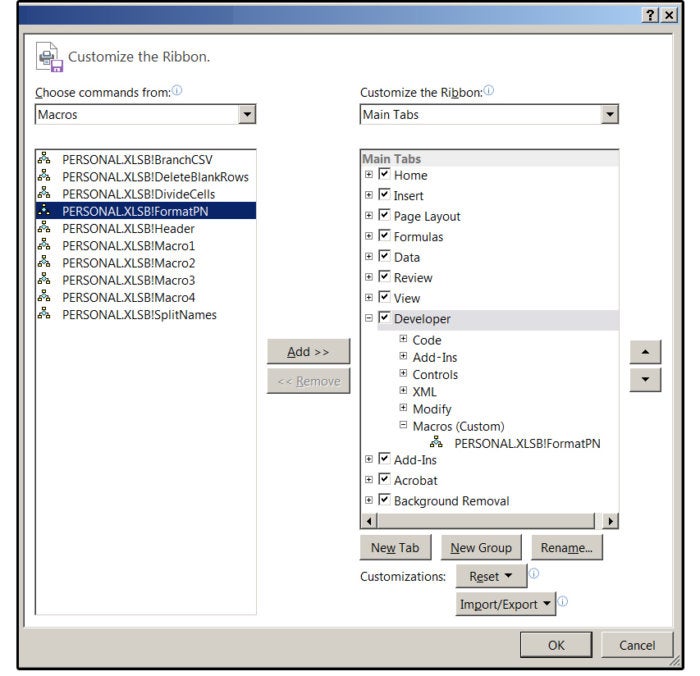
e. Next, click Macros in the left panel, and all the macros you have available on your system appear.
f. Selec the macro you want added to the Ribbon menu, then click the Add button. Notice the macro is added to your new custom group.
g. When finished, click OK.
h. Click the Developer tab, and the new Macros group appears at the far right end of this menu with your custom macro inside. Click this macro button to execute your macro.
 JD Sartain / PC World
Add a macro button to your customized group on the Ribbon menu
Let’s record an actual macro
Let’s walk through recording a simple macro to show how it’s done. Imagine that you receive a spreadsheet with a long list of phone numbers that use different formats; for example, some use dashes, some use periods, some use parentheses and dashes, and some use plus signs and letter. We’ll record a macro that finds all the periods and parentheses and replaces them with dashes, and format the cells for centered text (alignment left/right and top/bottom), except do not center the names in column A.
1. Select the Developer tab, then click the Record Macro button in the Code group.
2. In the Record Macro dialog, enter a Macro Name, a Shortcut key (if applicable), and a Description of your macro. For the Store Macro In field, leave it at the default of “Personal Macro Workbook,” then click OK.
3. You are now in Record mode. Everything you do is recorded, so don’t stray from the objective.
 JD Sartain / PC World
Record and name your macro
NOTE: The following macro uses the old Microsoft formatting commands (for example, all caps for commands and buttons) to prevent confusion between the commands/keys/buttons (such as tab and replace) and the dialog/menu tabs, fields, and instructions.
4. Enter the following keystrokes exactly as listed below:
CTRL+ HOME
CTRL+ A. (This highlights the entire database/matrix.)
Alt H F A (displays the Alignment tab of the Format Cells dialog box)
Center Center (in the Horizontal and Vertical field boxes)
OK (button)
CTRL+ HOME
DOWN
SHIFT+ END– DOWN
Alt H F A (displays the Alignment tab of the Format Cells dialog box)
Left Center (in the Horizontal and Vertical field boxes)
OK (button)
CTRL+ HOME
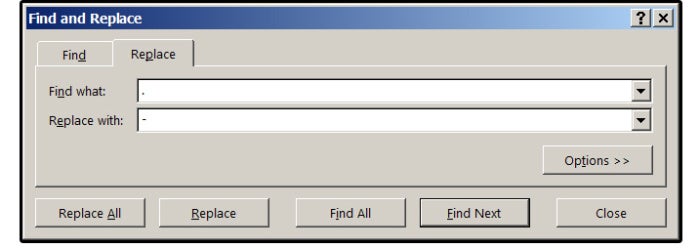
CTRL+ H (opens the Find and Replace dialog window)
Replace (click the Replace tab)
TAB (press the TAB key)
. TAB – REPLACE ALL (button) OK (button) (type a period in the Find field box, press the Tab key, then type a dash in the Replace field box, then press the REPLACE ALL button, then click OK button)
Replace (click the Replace tab to repeat this function)
TAB (press the TAB key to move to the Find What field box)
( (enter a left parenthesis to find that character)
TAB (press the Tab key to move to the Replace With field box)
BACKSPACE (press the BACKSPACE key to erase the previous transaction {the dash}, and to tell Excel to replace the left parentheses with nothing)
REPLACE ALL (button) OK (button) (press the REPLACE All button, then click OK button)
Replace (click the Replace tab to repeat this function)
TAB (press the TAB key to move to the Find What field box)
) _ (enter a right parenthesis and a space {press the space bar once} to find those two characters)
TAB (press the TAB key to move to the Replace With field box)
– (enter a dash in the Replace field box)
REPLACE ALL (button) OK (button) (press the REPLACE All button, then click OK button)
CLOSE (button)
 JD Sartain / PC World
Find and Replace commands in the macro
Developer > Macro Stop (select the Developer tab, then click the Macro Stop icon)
5. Undo all the changes you just made, then run the macro: Go to Developer > Macros, select (click) the FormatPN macro from the list, then click the Run button. POOF! The macro runs in one second!
6. Now, undo all the changes you just made again.
7. Then, go back to section 5–How to: create, name, and use macros, number 2–How to add a macro button to your personal, customized group on the Ribbon menu, and add your new FormatPN macro to the Ribbon menu.
8. Select the Developer tab, click the new macro icon, and watch your macro in action.