Excel spreadsheets do so much, from making lists to crunching numbers to acting as sophisticated flat-file databases. We’re creating this guide to make sure you master all the essentials and more. We’ll add to this guide over time, so bookmark it and come back to keep learning.
How Excel spreadsheets work: The basics
Think of an Excel spreadsheet as an electronic flat-file database modeled after a bookkeeper’s ledger. Excel’s “spreadsheet” is like the ledger’s page, and Excel’s “workbook” grouping of spreadsheets is akin to an entire ledger. The best use of a spreadsheet is to provide users with groups of records that are available on one screen for easier management.
Mentioned in this article
Office Home and Business 2016
The data on the spreadsheet is the database. The spreadsheet stores and maintains rows of records in associated fields (or columns), and it uses formulas to calculate the results of the spreadsheet data.
The list of additional features is long: tables, graphics, charts, spell-checker, thesaurus, custom formatting for text and numbers, custom reporting, printing, and so much more. Most of these features are user-friendly and so intuitive, you can play around with the options under the tabs on the Ribbon menu, and self-discover how they work and what they do.
The more complex features, like formulas, pivot tables, macros, and custom Visual Basic programming, are the areas where most users need guidance. We’ll be covering some of these topics in related articles, but meanwhile, you can use Excel’s heavily revamped Help files to learn about them.
Using Excel’s intuitive Help menus
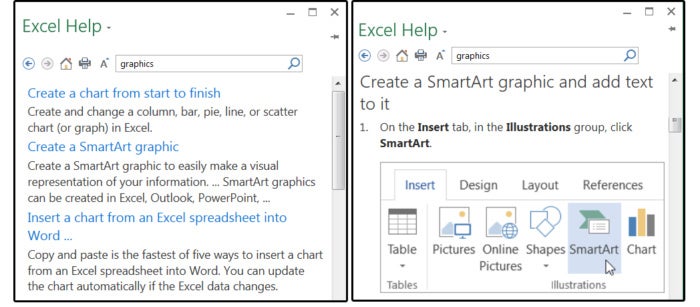
Use Excel’s extensive Help menus to learn about its more complex features. In Excel, the Function key F1 and the white question mark at the top right side of the Ribbon menu offer access the online Help menus. You can type a subject, command, feature, or option in the Search box, and Excel returns a long menu list of related items. Scroll through the options and select (double-click) the one that fits your specific needs. Excel then returns a submenu list with more detailed options or provides instructions for the original request.
 PC World / JD Sartain
Using Excel’s Help menu and tutorials.
In version 2016, Excel has added a more intuitive way to access the Help information. There’s a new tab called Tell me what you want to do at the end of the Ribbon menu. Just click this tab (or press Alt+ Q) and type your question, subject, command, feature, or option. Select one of the options from the list that appears, and Excel will provide instructions or take you directly to the correct place in the program.
 PC World / JD Sartain
Excel’s Tell me what you want to do tab lets you type in a search query or natural-language request to help you find the right menu item or further information.
Excel navigation and shortcut keys
Excel’s navigation and shortcut keys can help you move faster and more precisely around a spreadsheet of any size. Nail these basics to speed up your work, and check out Microsoft’s full list of Excel keyboard shortcuts for even more shortcuts. We also have some great tips for managing huge spreadsheets.
1. Moving from cell to cell
After you enter data into a cell, press one of the arrow keys to accept the data and move the cursor simultaneously (up, down, left, right). If you press the Enter key, the cursor moves down because entering data vertically (down a column) is much faster than entering data horizontally (across columns).
Note: This scheme seems illogical when entering related information such as names and addresses, because we’re accustomed to entering information one record (or row) at a time. But if you can manage the data by field (column)—for example, enter all the names first, then all the addresses—this method is much faster. Ask any accountant who calculates hundreds of columns of numbers each day.
2. Navigating throughout your spreadsheet
Use these keys and key combinations to get around your spreadsheet quicker than you can with a mouse.
Note that any combination of keystrokes separated by a hyphen means the keys must be pressed consecutively (one at a time). Combination keys separated by a plus sign are simultaneous keystrokes (e.g., Ctrl+ Home), which means you press the Ctrl key and hold, then press the Home key (simultaneously), then release both keys.
Enter moves the cursor down.
Shift+ Enter moves the cursor up.
Tab moves the cursor to the right.
Shift+ Tab moves it back to the left.
PageUp and PageDown move up or down one full screen.
Alt+ PageDown moves one full screen to the righ.
Alt+ PageUp moves one full screen to the left.
The Home key moves the cursor to the beginning of the current row in column A. For example, if the cursor is on row 5 (in any column) and you press the Home key, the cursor moves to A5.
Ctrl+ Home moves the cursor to the Home position (A1).
The End key moves the cursor to the end of any column or row that contains data before an empty cell. Consider this example: Your cursor is at A1, and you have records down to A15 and fields out to column G. If you press the End key followed by the down arrow, your cursor moves to the last cell (A15), because A16 is an empty cell. If the data resumes in A17, you must press End-Down to get to that cell.
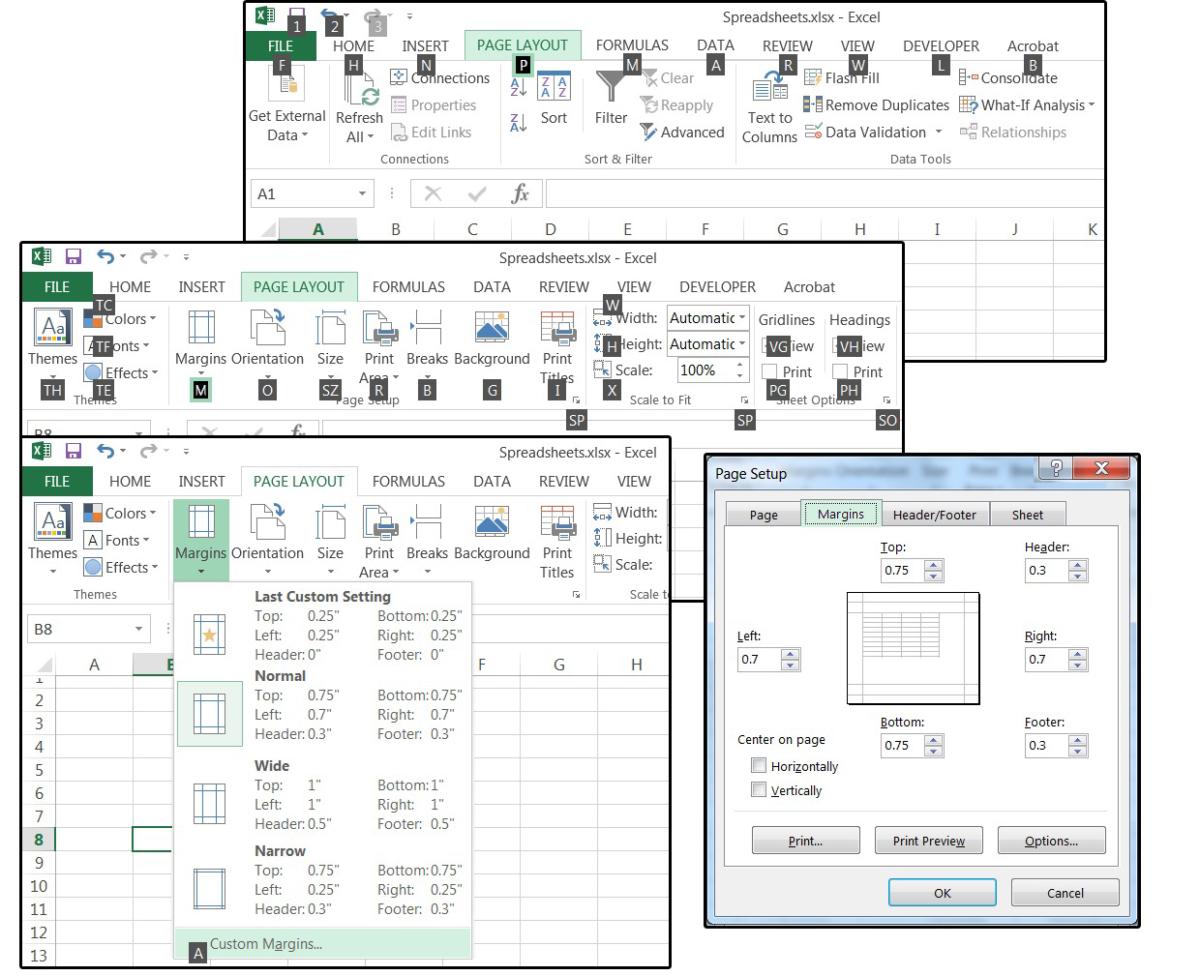
Press the Alt key to access (and view) the shortcut keys (letters highlighted with black boxes) for the tabs on the Ribbon menu. If you press the letter P at this point, the Page Layout menu displays with more shortcut keys. For example, under the Page Layout tab, you can press M for margins, O for orientation, or G for background.
If you choose M for margins, the Margins submenu appears,with options available by highlighted letter. Note that the letter ‘A’ is for Custom Margins. Press it, and the Page Setup screen appears with the Margins tab selected. Fill in your custom data and click OK.
 JD Sartain / PC World
Navigation keys plus shortcuts to access menus and commands.
Note: Once you remember these shortcuts, you can just type Alt-P-M-A (consecutive keystrokes) or Alt+P-M-A (simultaneous and consecutive keystrokes) to sprint directly to Custom Margins. This choice is a new development in Excel 2013 and 2016.
Understanding and using the navigation and menu/command keys are essential when creating macros because these little custom programs are fluid, dynamic instructions that manipulate every-changing data. If you hard-code cell addresses in your macros, the results will be inaccurate the minute you add, delete, or alter the database using that macro.
Understanding data sort and data filter in Excel
Many Excel users misunderstand the program’s sorting and filtering processes. Most databases generally combine the Sort command (called Indexing) with queries—requests for information, which may or may not contain filters—in order to extract information that matches specific criteria. In Excel, you might sort by ZIP code to get a discount on postage, or sort by state to see how many of your clients are in each one.
Basic sorting can be completed using a single button on the Ribbon menu. You don’t even have to highlight the range (although it’s recommended and safer).
1. Place your cursor anywhere inside the database (on the column you want to sort by). Note that Excel highlights the entire range automatically.
2. Click the Data tab, then click the Sort A-Z or Sort Z-A button to sort the data.
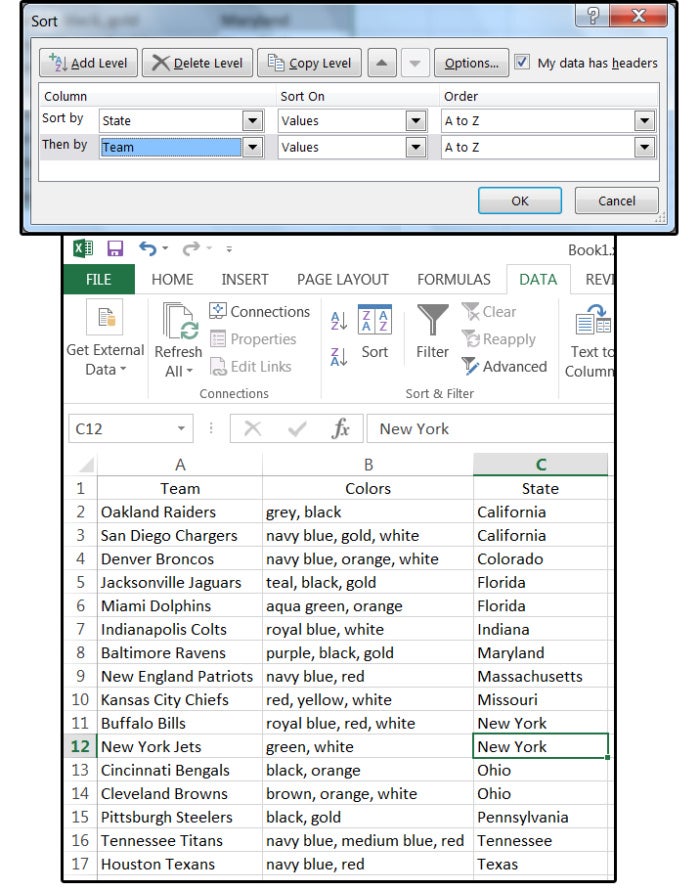
3. Another way: With the cursor still placed anywhere inside the database), click the Sort button and the Sort dialog appears. Note that even though your cursor (see below) is located on cell C12 (State = New York), the Sort menu still prompts for a Sort By key, Sort On information, and the sort Order.
4. Select State, skip the Sort On field, then select A-Z for the sort order, and Excel sorts the information alphabetically by State.
5. To sort by multiple fields (called sorting keys), repeat steps 3 and 4, then click the Add Level button and choose another field (under Column) from the drop-down list in the Then By field. Select Team.
6. Click OK, then notice that the data is sorted first by State, and then by Team(s) within each state.
 PC World / JD Sartain
The basics of sorting a range of data in Excel.
7. Using Filters to sort and display specific data is a bit different. Place your cursor on A1, or anywhere inside the range, or on the column you want to sort by.
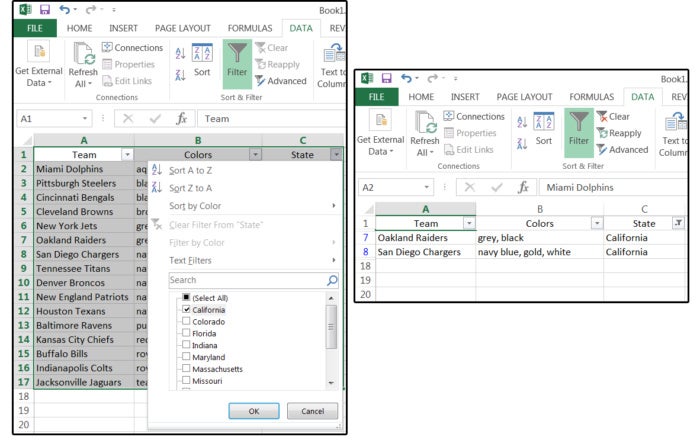
8. Click the Filter button under the Data tab. Note the small boxes with down arrows that appear beside each column/field name.
9. Click the arrow on the State field, and a Sort & Filter dialog menu pops up. Note that the Select All box is checked; therefore, every state is also checked.
10. Uncheck the Select All box, then check the State you want to filter out of this database. For this example, check California, click OK, and the database is reduced to only those rows and records equal to California. Note that the rows now say 1, 7, 8, and 18 through 1048576. Also note that the data is sorted by Team within the State of California.
11. When finished, click the Filter button again and the original database is restored (because filters do not remove your records; they are just temporarily hidden).
 PC World / JD Sartain
Use Filters to Sort and display specific data.
NOTE: For complex queries with multiple filters, use a Relational database spreadsheet and create Pivot Table reports.
Excel formulas and functions: Our best tips
Excel formulas and functions are what make spreadsheets tick, and we’ve written extensively about them in the past. Check out these essential tutorials for more information:
Excel formulas cheat sheet: 15 essential tips for calculations and other common tasksExcel logical formulas: Five simple IF statements to get started15 simple, yet powerful Excel functions you need to know