 Image: IDG
Once a PC enthusiast’s dream storage device, the solid-state drive (SSD) is quickly becoming commonplace in custom PC builds and retail desktops alike. After taking a detailed look at SSD technology, we’re moving on to basic care and feeding—how to stretch the life of your drive. All it takes is a little education, and some new ways of managing storage that have nothing to do with your traditional hard drive’s maintenance routine.
What wears down an SSD?
An SSD is flash storage. It has no moving parts. So unlike on a traditional mechanical hard drive, nothing breaks. SSD wear and tear has to do with write cycles.
Flash storage handles data in a specific way. When data is written to a block, the entire block must be erased before it can be written to again. The lifespan of an SSD is measured in these program-erase (P/E) cycles. Modern, consumer-grade, Multi-Level Cell (MLC) NAND memory can generally endure about 3,000 to 5,000 P/E cycles before the storage’s integrity starts to deteriorate. The higher-end, Single-Level Cell (SLC) flash memory chip can withstand up to 100,000 P/E cycles.
You’d have to work hard to reach the P/E cycle limit for an MLC-based drive, let alone an SLC-based one. Nevertheless, every time you write something to the drive, you bring it a little closer to its demise. Don’t obsess over every single write cycle—a few of our later tips are best suited for such tendencies—but do check out the following techniques for minimizing unnecessary writes to the drive.
No more defragging
First and foremost, your days of worrying about fragmented files are over. Because there is no moving read-write head, and because of the nature of flash memory and controllers, fragmentation as you understand it does not exist with SSDs. In fact, defragging makes numerous small, unnecessary, device-killing writes to the SSD—reason enough to eliminate it from your routine.
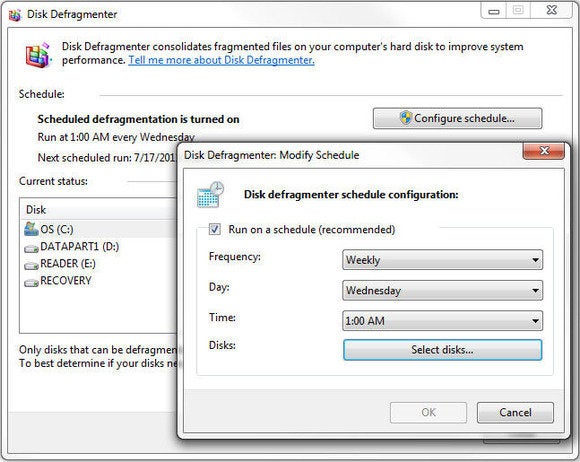
To turn off your disk defragmenter, uncheck the Run on a schedule box in the defragmenter program. If you have hard disks that would benefit from a good defragging, you can run the defragmenter on a schedule for those particular disks.
Disable search indexing
The search indexer made searching for files on a traditional hard drive speedier, but it doesn’t do much on an SSD except perform small writes. That’s a no-no! Disable it by searching for “services.msc” in the Start Menu search box

Find and right-click Windows Search to open the properties. Stop the service and set the ‘Startup type’ drop-down menu to Disabled.
What to put on SSD, what to put on HDD
Another key to SSD longevity is to use it for the right kind of data. SSD is great for applications, operating systems, and games, to crush load times and boot up applications at lightning speeds. There’d be nothing wrong with using SSD for data such as music, pictures, movies, and documents, but you don’t need the speed—and you probably wouldn’t want to waste write cycles on constant uploads and edits. A traditional, mechanical hard drive would suffice for the latter kinds of files.
Hibernating uses more writes
For those who have an SSD-endowed laptop, note how hibernation mode differs from sleep mode in SSD usage. When your computer hibernates, it stores open documents and programs to the SSD and shuts down completely. Sleep will pause everything, but it won’t write to the drive.
There are downsides to sleep mode: It uses a little more energy than hibernation, and if your battery runs down, those sleeping files are toast. In the case of an SSD, however, it makes economic sense in the long run to use a little extra power to avoid making unnecessary writes to the drive every time you step away from your system.
To disable hibernation, simply open your command prompt, type powercfg.exe /hibernate off (without any end punctuation), and press Enter. No more hibernating!
Bonus tip: optimizing performance with TRIM
The TRIM command solves a performance problem that eventually crops up in SSDs over the course of continued use. As noted above, when a block is written to, the entire block must be erased before it can be used to store new data. But the erasure process can slow the drive’s write performance if managed on the fly. The TRIM command steps in a little ahead of time and instructs the operating system (supported by Windows 7 onward) to erase data blocks that are no longer in use, preparing them to be written to directly without further ado.
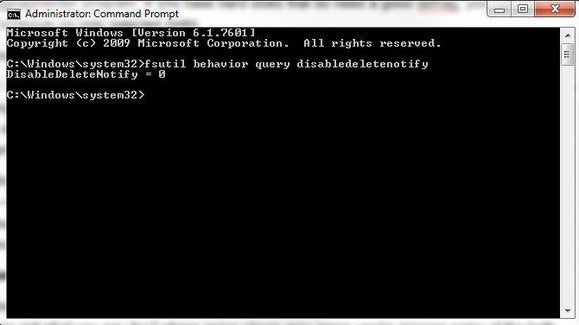
Windows 7 and 8 should detect an SSD and enable TRIM automatically if the drive supports it—but it’s a good idea to check anyway. Open the command prompt and type fsutil behavior query disabledeletenotify (without any end punctuation). If you get ‘DisableDeleteNotify = 0’ as a response, you’re set. If you don’t, confirm that your SSD drivers are up-to-date.
So just how long will it last?
While these techniques should wring more life out of your SSD, the truth is that vendors are loath to discuss drive longevity in greater detail. We happened upon an industrious German computer programmer who crunched some numbers and came up with this chart:
 ef.gy
ef.gyThe chart shows the wear on different-size drives after continuous writing at 6 gigabytes per second (GBps) to get to approximately 100,000 P/E cycles. This test would never happen in a natural setting—there’s no way to continuously write 6 GBps with today’s tech—and it’s far more punishing than anything a regular user would do. The smallest drive lasted for nearly 2 months, while the largest lasted for more than a year. Quite the troopers.
For the average user who doesn’t write heaps of data to storage constantly, your SSD will probably live a long and happy life. And if you adjust your storage habits to the SSD’s strengths, you could squeeze a few more cycles out of the drive.