 Image: SanDisk
Most Windows users have become conditioned over time to never unplug a USB flash drive or hard drive without first clicking Safely Remove Hardware in the System Tray.
Why is that necessary? In theory, it’s to ensure that Windows isn’t busy reading from or writing to the drive when you remove it, something that could result in corrupted data or even a damaged drive.
As it turns out, however, you can safely sidestep Safely Remove Hardware with little to no loss of performance. In fact, this option may already be enabled on your system, and you just didn’t know it. Yep, you may have been wasting extra clicks all this time.
Do this:
1. Plug your USB drive into your PC, then open Device Manager. (Note: These steps are based on Windows 7. Things might look different in previous versions of Windows.)
2. Expand Disk Drives, then find the entry for your removable drive. On my system, for example, it’s called “USB2.0 Flash Disk USB Device.”
3. Right-click that entry, then click Properties.
4. Click the Policies tab; you should see something like this:
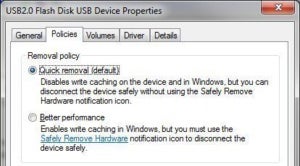 Windows
5. If the first option, Quick removal, is already selected, you’re good to go. As noted in its description, “you can disconnect the device safely without using the Safely Remove Hardware notification icon.” If Better performance is selected, switch to Quick removal and click OK.
So, what are giving up by disabling write caching? According to the test results posted at 7tutorials, almost nothing. The performance impact was negligible. Your mileage may vary, of course, but I think it’s worth a few milliseconds to avoid the hassles of having to mess with Safely Remove Hardware all the time.